Hello
again! Back to the miniatures table after a summer at our little
cabin on a north Saskatchewan lake! BBQs, beer, sand, sailing, etc.
Now that snow and winter has arrived in Saskatoon (-21 C, -27 wind
chill at game time) it's time to push some of the "little fellas"
around the table again while we wait for spring.
It
looks like we are still not done with Stalingrad so this scenario
takes place further south, a few weeks after the last scenario,
Barrikady Hall 6A. In this one some
of 24th Panzer Division's units have been ordered south to take over
defensive positions at the southern end of the Red October steel
factory (Krazny Oktyabr), jumping out of the frying pan into the
fire.
We
continued with our customized set of rules for company/battalion
based on the Panzergrenadier series (Deluxe & 2nd Edition),
adding in some "special" Stalingrad rules. When
we use a custom rule in the game log I'll indicate in blue to show
where we depart from the original rules. To help refresh our
memories about the game rules after the summer layoff I decided to
moderate while Brent and Tim played. This AAR is reported in some
detail for those that already play with the BGPG rules or those
interested to see how BGPG plays. Or if you wish you can just look
at the photos to follow the game events!
Krazny
Oktyabr - October 10, 1942
Historical
Overview
By
the end of October the 24th Panzer Division is sufficiently depleted
from fighting in Stalingrad from the beginning so not considered
available for further large offensive operations. On November 1 some
elements were ordered to take over defensive positions from 79th
Infantry Division in the southern part of the Steel Factory near Hall
10. This was a very active attack point for the Russians in late
October and this thrust continues against the 24th Panzer positions
in early November. Sometimes Russian combat patrols are not spotted
until within 20 meters of the German front line of trenches and shell
craters due to the rubble everywhere resulting from months of
bombardment. A determined Russian attack occurs on November 10. This
scenario is loosely based on the various November battles in the
southern Steel Factory.
References:
Death
of The Leaping Horseman: 24th Panzer Division in Stalingrad by Jason
D. Mark
Map
And General Scenario Notes:
The
table represents the area at the south-east end of the Steel Factory
and includes part of the Volga bank and the burned-out oil farm and
major gully (Bannyi Schlucht) to the south.
Here
is a general view including the starting areas for each side :

All of the defending German units are deployed dug-in and Hidden north of the blue line with the Russian attacking forces deployed under blinds south of the red line. This is mainly an infantry slugfest so no armour is initially involved. However if German reserves are invoked limited tank support is included. The scenario proved to be very exciting for both players since they had no idea of the enemy dispositions, reserves, and strengths at start!
The
relative force strengths were added up using only those forces likely
to be involved in the initial battle, The eight full Inexperienced
Russian platoons only totalled 520 points for the attacker! The long
thin line of German defenders totalled 655 points. At first this
seemed to be totally wrong since in BGPG we have found the
attacker/defender ratio should be at least in the 1.25 to 1.5 area.
However, the Russian's attacks are focused on only 2 areas so only
about 425 points of the German forces should be involved, with no
support allowed from adjacent German units. This put the ratio at
almost 1.25 so I decided to do a solo "test run" with that.
After lucky dice rolls neutralized the German MMGs the Russian horde
just crushed the Germans ! So I decided to add in some German
reinforcements that would arrive only if triggered by a huge Russian
success, since much of the German strength depends on the survival of
the MMGs. This also was rather historical since early Russian
success was later wiped out by later German counterattacks.
I
designed the scenario victory conditions to favour the Russians since
any ground gained through local counterattacks in this area continued
to thwart further German progress to the Volga. A variable game end
was used starting at the end of Turn 7. Because the Germans do not
know the Russian objectives, if the game ends by dice roll at the end
of a turn, they get 2 VP for each Hall they control (no enemy troops
on ground floor), 1 VP point if shared with enemy troops, 0 VP if
only enemy troops. The Russians are only attacking Hall 10 and 8 so
would get 4 VP for control, 3 VP for shared, and 0 VP for only enemy.
If
At Game End Russian German Winner
The
Russians: VP VP
Control 0 0 6 German Major
Share 1 3 5 German Minor
Share
2 6 4 Russian Minor
Control
1 5 4 Russian Minor
Control
1 & Share 1 8 3 Russian Major
Control
2 10 2 Russian Major
We
play on a 5x4 foot table in 15mm with figures based on FoW stands and
use modified Panzergrenadier rules: Our guns and tanks are 1:1 and we
use the 20mm ranges for firing and activation. We also replace Built
Up Area terrain with individual buildings or portions of buildings as
"small terrain features." We
continued to refine and use our special Stalingrad rules that modify
the basic LOS, terrain effects, close assault, troop quality and
motivation level rules.
Krazny
Oktyabr Special Terrain And Movement Rules:
In
November at the Steel Factory the terrain has been pounded by heavy
artillery and Stuka bombs to the point that it all of what used to be
Open Ground is now Rubble (Difficult Terrain) allowing LOS with -1
DRM Cover, but only tactical movement even for infantry. Roads &
rail tracks are “Light Rubble" with -1 DRM Cover allowing LOS,
still requiring tactical moves for infantry, but not classed as
Difficult Terrain for vehicles. LOS visibility between ground level
units is limited to 8 inches due to rubble, smoke and dust. Even LOS
to/from elevated positions is only 12 inches (+1 DRM down). Shell
craters are Hard Cover, Impassable by vehicles, and a -1 DRM
Hindrance.
LOS
between units at the same level inside a factory is limited to 1 inch
and provides Hard Cover for Direct Fire and a +2 Strongpoint DRM for
the defender in Close Assaults. From outside the factory there is no
LOS to/from units inside a factory unless they are manning a wall.
Since
the level of rubble throughout the battlefield approaches the same
level of cover in factories, factories are not considered to be large
or small terrain features so eligibility for Close Assaults are
treated the same as for open ground (only friendly units within 1"
of a Close Assaulted defender are included).
The
Exploit
Order Phase is not used.
Krazny
Oktyabr Troop Quality Rules:
Germans:
Breakpoint is back to 50% to reflect losses but, with a defensive
mind-set still begrudging any retreat from hard-earned positions,
they ignore suppression results from Breakpoint Tests.
Russians:
Their ability to adapt to "rattenkrieg" with no option of
retreat altered their resistance to effectively a fanatical level.
Therefore the Russian ignores any suppression results from a
Breakpoint Test. Russians also have a whopping 70% Battlegroup
Breakpoint before losing the game. In addition, all units have unique
capabilities to accent their defensive strength: All units are 2D6 =
7 for Phase Activation, -1 for Direct Fire, +1 for Close Assault, +1
for Morale and +1 for Rally, absolute. See scenario briefing for
further details. Due to the chaotic battle conditions coordination
between platoons units is poor so no Coordinated Infantry Assaults
are allowed
.
.
German
Briefing and Force (Hauptmann Von Pollus)
In
command of 24th Panzer Division troops you are ordered to hold the
current front line positions earned by the deaths of many men of 79th
Infantry Division previously assigned to this sector. In particularly
hold at all costs Halls 8, 9 and 10. Enemy attacks in this area have
been constant and determined. If outflanked by nearby enemy
penetrations, forward positions may withdraw to maintain a continuous
line but withdrawing troops may not leave their assigned frontage to
aid adjacent platoons. Infantry reserves with armour support are
available if that occurs. Available artillery and air support will
not be available since the attackers will already be at extremely
close range.
Mission:
Cause
a Russian Battlegroup Break Point for an instant victory, or have
the most Victory Points at game end. VP = 2 each for no enemy troops
in the ground floor of Halls 8, 9, or 10. VP = 1 each if shared with
enemy troops. VP = 0 if only enemy troops present.
Special
Rules: Ignore Breakpoint suppression retreats. Battlegroup
Breakpoint is 50%. Special Stalingrad terrain, movement, and troop
quality rules in effect. The
MMG Teams may not be moved other than to rotate in position (stay in
place with Damage if Disengaged). Platoons not in buildings must hold
starting positions unless flanked. If flanked, the only movement
order allowed is with a Withdraw Order.
Deployment:
On
Table at Start: (unless indicated,deployed at ground level as per
map, dug-in and hidden)
Elements
of 24th Panzer Division (all Regular except as noted)
Battlegroup Command (Veteran)
Infantry Company #1 Command
Pzg Plt (Command, 3xRifle/LMG squad)
Pzg Plt (Command, 3xRifle/LMG squad)
Pzg Plt (Command, 3xRifle/LMG squad)
MMG Team (1x MMG Team) - (top floor Hall 10)
Infantry Company #2 Command
Pzg Plt (Command, 3xRifle/LMG squad)
Pzg Plt (Command, 3xRifle/LMG squad)
MMG Team (1x MMG Team) - (top floor Hall 8)
Reserves:
Reserve
1: Next German Phase after there are only Russian troops in the
southmost ground floor areas of Halls 8 or 9.
Pzg Plt (Command, 4xRifle/LMG squad)
Heavy Panzer (1x PzIVD) (on north west road edge)
Reserve 2: Next German Phase after there are only Russian Troops in the ground floor of Hall 10.
Pzg Plt (Command, 4xRifle/LMG squad)
Heavy Panzer (1x PzIVD) (on north east road edge)
Pzg Plt (Command, 4xRifle/LMG squad)
Heavy Panzer (1x PzIVD) (on north west road edge)
Reserve 2: Next German Phase after there are only Russian Troops in the ground floor of Hall 10.
Pzg Plt (Command, 4xRifle/LMG squad)
Heavy Panzer (1x PzIVD) (on north east road edge)
Here
is the German deployment:

The German platoon defending the Hall 10 is most concerned with the Volga bank and nearby gully and are supported by an upper floor MMG which will also cover part of the ground in front of Hall 9.

Similarly
an MMG is added the upper floor of Hall 8 ruins to support the
platoons defending Hall 8 and part of Hall 9.

After
the usual brief enemy artillery barrage this morning causing no
casualties (the German troops had their heads down), heavy enemy
troop movements are heard in the Volga bank and the south gully...
Russian
Briefing and Force (Kapitan Millerov)
As
local commander of the Russian troops under Chuikov's 62nd Army you
are ordered to attack toward two objectives, Hall 10 and Hall 8. The
goal is to outflank German forces in Hall 9 to force them to
withdraw. Chuikov has ordered all available nearby troops for your
use and they are in their jump-off points currently hidden by the
Volga bank, oil tanks, Bannyi Schlucht and the Machine Shop. No
artillery or air support is provided since your troops will be at
close quarters for all of the fighting.
Mission:
Cause a German Battlegroup Break Point for an instant victory, or
have the most VP at game end. VP = 5 each for no enemy troops in the
ground floor of Hall 8 (southmost two areas) or Hall 10. VP = 3 if
shared with enemy troops. VP = 0 if only enemy troops present.
Special
Rules: Ignore Breakpoint suppression retreats. Battlegroup
Breakpoint is 70%. Special
Stalingrad terrain, movement, and troop quality rules in effect.
Deployment:
On
Table at Start (deployed under blinds as per map):
Elements
of 138th Division (all Inexperienced except as noted)
Battlegroup
Command (Regular) - Near Blind 3
1st
Company Command - Near Blind 7
Rifle
Platoon (command, 4x rifle squad) - Blind 3
Rifle
Platoon (command, 4x rifle squad) - Blind 5
Rifle
Platoon (command, 4x rifle squad) - Blind 7
Rifle
Platoon (command, 4x rifle squad) - Blind 8
2nd
Company Command - Near Blind 13
Rifle
Platoon (command, 4x rifle squad) - Blind 12
Rifle
Platoon (command, 4x rifle squad) - Blind 13
Rifle
Platoon (command, 4x rifle squad) - Blind 14
Rifle
Platoon (command, 4x rifle squad) - Blind 15
(Blinds
1,2,4,6,9,10,11 are Decoys)
Reserves:
None
Here
is the Russian set-up with the most likely routes of advance to their
objectives.

For the Motherland!
Game
Play
Turn
1 - German initiative &
force the Russians to go first.
Russian
Command Phase:
Kapitan
Millerov orders a tactical Move & Fire for Blind #15 which
charges forward and moves into LOS of a hidden German MMG on the top
floor of Hall #8 and a dug-in squad (blue). They both reveal and
defensive fire at the newly revealed Russian platoon (white)
resulting in one squad hitting the dirt, suppressed. The Russian
platoon's fire is all over the place and misses. Millerov next
orders Blind #14 to move into Building 1 and Blinds #12 and #13 to
move into Hall 8A. In the centre Blind #11 moves up into LOS of
hidden German units and is revealed to be a decoy.

Further
east Blinds #9 & #10 move up into LOS of more hidden German units
and are both revealed to be decoys. Blind
#8 moves east (see photo below in German turn) toward the oil
unloading tank into LOS of two hidden dug-in German squads (green).
They both defensive fire at the newly revealed Russian platoon (blue). One
fire is a double 6 dispersing one Russian squad! Ouch! A second
Russian squad is suppressed. Determined Russian fire causes one
suppression test but the German squad shrugs it off . Millerov
orders Blinds #6 and #7 to move east into the Volga bank gully near
Hall 10 to join Blind #5 to concentrated friendly forces there. The
remaining blinds #1 - #4 just reposition north within the Volga
bank. End Russian Command Phase.
German
Command Phase:
In the
east the two German green squads fire again on the Russian blue
squads causing one to lose heart and disengage back into the cover of
a burned-out steel oil tank. Return Russian fire all misses. The
Germans are rolling hot so far and the Russians are not!

In the
west, Hpt. Von Pollus orders the German MMG and blue squad to fire at
the Russian white platoon but both miss. The Russian return fire is
also off target. [Custom
Rule: A unit fired on is an Acquired Target by the firing unit with
automatic activation to fire at it. Units that are mutual Acquired
Targets are engaged and roll dice to see who fires first (Interactive
Fire)] End German
Command Phase.
Rally
Phase:
All the
Russian squads rally. End of Turn 1.
Turn
2 - Germans barely win
initiative & force the Russians to go first.
Russian
Command Phase:
Out west
Kap. Millerov orders the white platoon to boldly advance toward Hall
8 taking defensive fire from the westmost German blue squad that
misses. The Russian tactical fire is on target and suppresses the
German squad. Then Millerov orders the rest of the nearby blinds to
advance. Blind #14 moves out of Building 1 into LOS of the MMG and
reveals a platoon (grey), but no defensive fire from the Germans who
realize there may be two more platoons coming next. The Russian
platoon's tactical fire at the MMG just bounces off the bricks.
Blind #13 moves out of Hall 8A into the MMG's LOS and sure enough
reveals another platoon (purple). One new dug-in German blue squad
just east of the westmost German squad now reveals and defensive
fires at the purple platoon along with the MMG. One Russian squad
barely survives a dispersal test and runs back to Hall 8A. Another
Russian squad fails two disengage tests and is wiped out due to
double damage! [Custom
Rule: Infantry units also take damage.]
Blind #12 moves out of Hall 8A into LOS of the MMG and reveals still
another platoon (green). Two more new German squads reveal and
defensive fire, one blue squad near Hall 8 and one grey squad in a
shell hole just south of Hall 9. One misses but the other causes a
Russian squad to falter and disengage back to Hall 8A. Russian
tactical fire is anywhere but on target. German fire continues to
make it hot for the Russians!

Further
east, Kap. Millerov orders the blue platoon at the oil farm to
advance. They run into seriously accurate defensive fire from the
two German green squads and one Russian squad is dispersed!

Seeing
the strong resistance at the oil farm Millerov now orders Blind #5
out of the gully near the oil unloading tank revealing a platoon
(tan) that charges toward Hall 10. One German squad in the ground
floor of Hall 10 and another dug-in German squad just to the south
reveal themselves and both defensive fire at the Russian platoon
suppressing one squad in the ruins to the east. A German MMG reveals
itself on the top floor of Hall 10 and fires on the Russian tan
platoon, causing one squad to lose heart and disengage back into the
gully. However, one Russian morale test results in a double six which
allows an immediate Reaction Shot against the MMG suppressing it!
Urraahhh! The remaining two Russian squads and commander valiantly
charge forward and press home an assault on the forward dug-in German
squad, dispersing it while only suffering one suppressed squad in
return. Finally a Russian success! After winning the assault they
reposition to better cover in the nearby shell crater and ruins.

The
Blinds #3 and #4 move threateningly north along the Volga bank and
into the north gully, staying hidden. End Russian Command Phase.
German
Command Phase:
A second
German squad in Hall 10 reveals and both squads fire at the Russian
squads but they are off target. Russian return fire also just pings
off the bricks. Further west the two dug-in German squads near the
oil tanks fire on the Russian squads in the shell holes but the
Russians just duck down. Russian return fire also misses (no
photos). A brief standoff at Hall 10 and the oil farm.
To the
west, the German grey squad fires on a Russian green squad but misses
as does the Russian return fire. The two German green squads more to
the west fire at the Russian purple squads and aim straight and
disperse one squad! Finally Von Pollus orders the MMG to fire on the
westmost Russian white platoon with devastating effect, dispersing
one squad and causing another squad to abandon the charge and run
back to Building 1! Nasty MMGs! End German Command Phase.

Rally
Phase:
All
Russian squads in the west rally except the one in Building 1 and the
one in Hall 8A. The western German squad rallies Battle Hardened!
In the east all the Russian squads rally except the squad in the
gully. The Russian squad in the ruins also rallies Battle Hardened!
Unfortunately for the Russians, the German MMG in Hall 10 also
rallies. End Turn 2.
Turn
3 - German again wins
initiative and again forces the Russian to go first.
Russian
Command Phase:
Near the
Volga, Kap Millerov orders his Russian platoon (tan) near Hall 10 to
get going and bravely assault the German squads in the ground floor
of Hall 10. Hpt. Pollus holds fire with the MMG since there are
still two more Russian blinds in the nearby gully. The German
platoon's defensive fire causes one Russian squad to falter and
disengage back to the ruins but the remaining two squads and
commander charge into close assault against the two German squads in
Hall 10 and get a surprise with a German commander that was lurking
right behind them.

The
Germans roll very high causing the Russians to lose all 3 attacking
units! Yikes! The Russians roll average causing one German squad to
be dispersed and another suppressed. There aren't even any Russians
left to retreat from the fight!

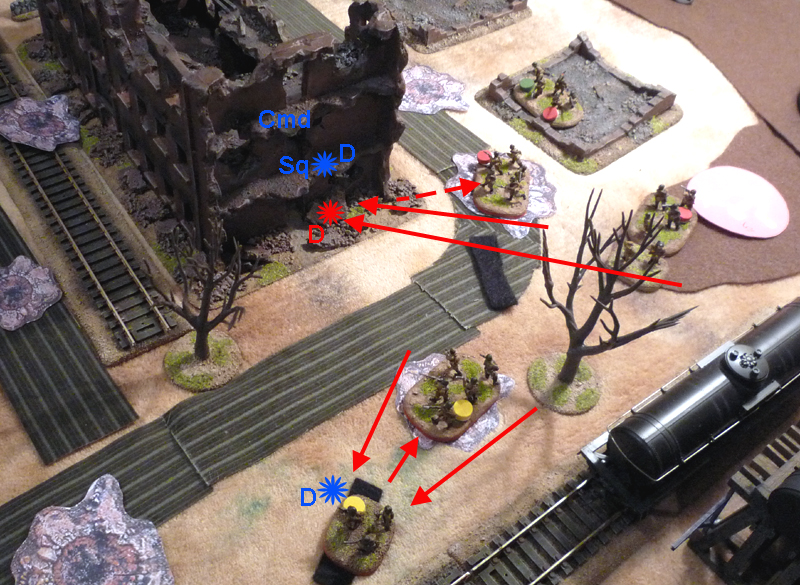
With most of his tan platoon unfortunately wiped out Kap. Millerov orders Blind #7 out of the gully and reveals a Russian platoon (red) which is immediately shot at by the nasty MMG, again with harsh effect, dispersing one squad and suppressing another! German MMG fire continues to devastate. However, Lady Luck steps in (as usual) and during the Russian end-of-move tactical fire at the MMG one Russian squad fires at the MMG and with deadly accuracy rolls a double six, eliminating the MMG! Payback time! A bit further west the Russian blue squad in the shell crater near the oil unloading fires and misses the German green squad with the return fire also off target.

Over to
the west Millerov orders the green platoon with 2 squads and
commander to charge forward and assault the nearest German blue
squad. One Russian squad is stopped by defensive fire and retreats
back to the shell hole, but the remaining two Russian units press
home the assault. The rolls for both sides result in one suppression
each so the the Russians win the assault because they have one
unsuppressed unit left after the assault. The German squad retreats
back into Hall 8 and passes his rally test. [
Units retreating from a lost close assault must pass a Rally Test or
they are suppressed]
Then Millerov orders the purple platoon's squad and commander to
assault the centre German green squad, but the accurate defensive
fire hits the leading platoon commander hard and he fails his morale
roll miserably and he is dispersed! The surviving Russian squad
plunges into close combat and takes one suppression but causes two
suppressions on the German squad. The Russians win the close assault
causing the German squad to be damaged and retreat back into Hall 8.
The purple squad wisely decides to reposition back behind the tracks
out of close range of the MMG.
The
white platoon now rushes forward and close assaults the battle
hardened western German blue squad which misses with defensive fire.
The German squad is easily eliminated but being Battle Hardened he
heroically disperses two Russian squads and suppresses the commander!

Finally
the Russian grey platoon advances toward Hall 8 and comes under heavy
fire from the MMG which is accurate and deadly, dispersing one squad
and causing a second to break off the charge and head back to a shell
crater. The Russian tactical fire just pings off the bricks.

End
Russian Command Phase.
German
Command Phase:
Von
Pollus orders the German dug-in green squad by the oil unloading to
fire and they shoot straight causing a Russian red squad to abandon
position and retreat back into the gully. However, the defensive
fire from an adjacent Russian squad is on target and suppresses the
German squad. The nearby German green squad fires on the Russian
squad in a shell crater near the oil farm but misses. However, the
Russian return defensive fire roll is a double-six which disperses
the German squad! An encouraging success for the Russians!

A bit
more to the west the German grey platoon in front of Hall 9 having
seen a friendly platoon's squad on their left flank just wiped out by
Russians and company strength Russians outflanking them to the right,
Von Pollus orders them to withdraw back towards, and some into, Hall
9.

In the
far west, the MMG fires on the Russian grey platoon right in front of
it, merely suppressing one squad. Russian return fire just bounces.
End German Command Phase.

Rally
Phase
The
Russian white squad in Building 1 rolls extra low and routs! All
other German and Russian squads rally except one Russian squad in the
eastern shell crater by the oil tanks, one Russian green squad in the
western shell crater and one Russian squad in Hall 8A. End Turn 3.
Turn
4 - Russian
Initiative and goes first.
Russian
Command Phase:
In the
west Kap. Millerov activates the green platoon, now down to one squad
and platoon commander, and orders them to close assault Hall 8 from
east side flank. One German squad in LOS defensive fires and misses.
But it is 2 Russian vs 3 German units so the assault does not go well
for the Russians. Both the Russian squad and platoon commander are
eliminated but they at least take out 1 German squad in return. Then
using combined arms, the tan platoon (2 squads & commander), 1
purple, 1 grey squad and the white platoon commander simultaneously
rise up and with a loud "UUURRRAAHHHH" charge forward and
close assault Hall 8. The MMG and one German squad defensive fire
which suppresses their commander and causes one Russian grey squad to
disengage back to a shell hole.

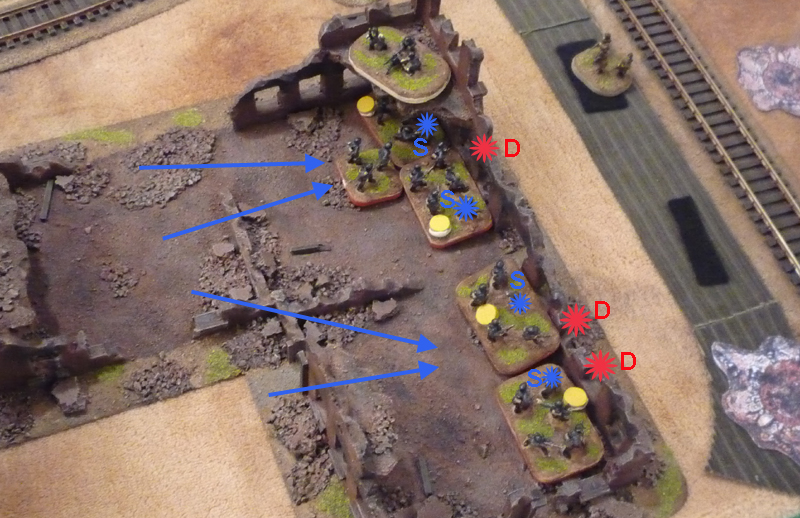
The
remaining 4 units assault into Hall 8, eliminating the last 2 German
units (platoon command and squad) but 1 Russian unit is dispersed.
The Russians have cleared Hall 8's ground floor and the two squads
and commander take up new positions as much out of the upper floor
MMG's LOS as possible.

Sensing
a Russian breakthrough and hoping that the last pesky MMG is soon
silenced the company commander in Hall 8A and a purple squad advance
to a shell hole on their way to reinforce Hall 8.

Over to
the east near the oil farm the blue platoon commander and a squad
advance and fire at the German green squad in the foxhole but miss as
does the return fire. Now Kap. Millerov activates the Russian red
platoon and orders two squads to assault Hall 10 and the remaining
squad and platoon commander to assault the German green squad in the
foxhole. This must have the Germans rattled since all their defensive
fire misses. The German squad in the foxhole is wiped out with both
assaulting Russians just taking suppressions so the Russians win. The
platoon commander and squad reposition into the foxhole and a nearby
shell hole. The other two red Russian squads assault Hall10 against
a defending German squad and platoon commander. In the assault one
German squad is dispersed and one Russian squad dispersed. A tie so
the German defender wins since there are still unsuppressed German
defenders. The remaining Russian squad withdraws to a nearby shell
crater and passes his rally. Then Kap. Millerov orders the company
commander in the gully to activate the two nearby tan squads, hoping
they can charge in and finish off the lone defending platoon
commander in Hall 10. But they roll snake eyes for activation causing
Command Confusion and the Russians lose 3 CP! [Custom
Rule: Only a double-one roll for any activation attempt causes
Command Confusion and a loss of only 3 Command Impetus.]
In the
far north-east Blind #3 activates and charges out of the Volga gully
revealing a Russian platoon (cyan) plus the Battlegroup Commander.
Unbeknownst to them they are sighted by a fresh German green platoon
dug-in to the north of Hall 10, which reveals itself with defensive
fire.

The
Russian platoon doesn't falter a bit and immediately close assaults
the German green platoon. German defensive fire causes one Russian
squad to change its mind and retreat back into the gully while the
rest press home the assault. the Russian platoon wins the assault
losing one Russian squad but eliminating two German squads. The
remainder of the German platoon retreats behind the rail car and
passes rally.

Now that
the threat to their right flank is reduced, on their repositioning
move after the successful close assault the Russians pull back into
to the cover of nearby shell holes and ruins. End Russian Command
Phase.
German
Command Phase:
In the
far northeast Hpt. Von Pollus orders his units to fire. The green
squad behind the flatcar fires at the nearby Russian squad and
misses. A new German squad at the north end of Hall 10 reveals by
firing at a nearby Russian squad in a shell hole but also misses.
His platoon commander moves north from the south end of Hall 10 to
support his remaining squad.

Over to
the west in Hall 8 the MMG repositions to fire down at the Russian
platoon commander below him and hits but the Russian commander
casually shrugs off two disengage tests.

Because
the ground floor of Hall 8 is now occupied only by Russian troops,
this triggers German reserves of one new infantry platoon (red) which
appears activated in the north area of Hall 8 and one PzIVD which
appears activated at table edge on the nearby road. The tank must
stay on the road or railway track, otherwise take a bog test for
movement.

Appreciating
the arrival of support, Von Pollus orders the tank to move up the
road and, spying the Russian platoon commander in Hall 8, fires his
75mm gun at him causing the platoon commander to retreat back into
the ruins. The reserve red platoon then moves up into the middle
area of Hall 8, still out of LOS of the Russians. End German Command
Phase.

Rally
Phase:
Unfortunately
for the Russians only three Russian squads rally. The rest fail to
rally: The platoon commander in Hall 8, the grey squad in a shell
hole near Building 1, the purple squad in Hall 8A, the red platoon
commander in the foxhole south of Hall 10, and the cyan squad in the
northeast gully. End Turn 4.
Turn
5 - German Initiative and
goes first.
German
Command Phase:
The MMG
team, seeing help on the way fires at the Russian platoon commander
but misses. The PzIV moves further up the road and railway track to
get into better range of the enemy. Still seeing Russian troops in
Hall 8 the PzIV fires his 75mm at the Russian squad there causing him
to think there must be better places to be and disengage back into
the ruins beside his platoon commander.

Then Von
Pollus orders the German red platoon in Hall 8 to clear the building
of all Russians. The platoon advances and close assaults with two
separate combats. The westmost combat with two German squads
assaulting the suppressed platoon commander and squad. In this
assault the two suppressed Russians are eliminated but still manage
to suppress both German squads. In the nearby combat just to the east
the remaining two German squads and their platoon commander assault
the lone Russian squad. The Russian squad is easily dispersed but he
also valiantly manages to suppress two German squads.
Over to
the far northeast the German green squad behind the flatcar fires and
suppresses the nearby cyan Russian squad in a shell hole. Also the
squad in Hall 10 fires on the nearby Russian cyan squad in a shell
hole and with deadly aim scores a double-six and disperses it! End
German Command Phase.

Russian
Command Phase:
The
unexpected loss of the 3 Russian units in Hall 8 and the squad to the
far northeast has put the Russian side dangerously close to their
Battlegroup Break point. So Kap. Millerov orders the Russian company
command near Hall 8A with a combined arms order to activate a purple
and green squad and move them further east, away from potential enemy
fire. He also orders the grey platoon commander in front of Hall 8
to withdraw toward Hall 8A, but the German PzIV defensive fires with
uncanny accuracy and, unfortunately for the Russians, scores a
double-six which ends the platoon commander troubles. This pushes
the Russian side over their Battlegroup Breakpoint immediately ending
the game.

Here is
the table at game end with a red dot for Russian troops and a blue
dot for visible German troops (the still hidden German Battlegroup
Commander and Company Commanders are not shown).

Tallying
The Score:
The
Russians lost 25 of 35 units (71%) and the Germans lost 12 of 38
units (32%).
Comments
On The Scenario:
The
German MMGs were awesome! The MMG in Hall 8 caused enough mayhem to
put the Russians quite far along the road to their Breakpoint . Since
the game ended this way we didn't get to define the level of victory
based on points earned for each side. I'm still not sure if the
initial Russian/German force ratio was high enough, but I feel the
balance is so dependent on the MMGs that Lady Luck could step in
either way. In any case the group enjoyed playing it!
Historical
Aftermath:
On
November 10 several hundred Russians managed to assault and control
the southern half of Hall 10 but were unable to penetrate further
there and also were stopped in the attacks further west toward Halls
9 and 8. Over the day, determined German counterattacks managed to
hold against six Russian attacks of 200 to 300 men. Hall 10 was
retaken by the Germans the next day, but near daily Russian attacks
thereafter ensured that this was the furthest east that the German
advance ever achieved in the south part of the steel factory.
Comments On The Panzergrenadier Customized Rules:
The special Stalingrad rules for modelling the intense "rattenkrieg" urban combat seemed to replicate the challenges faced by both sides. The better rally and morale DRMs plus the higher Breakpoint for the Russians was still offset by their inexperience level for activation and firing DRMs. We continue to enjoy game play with this customized rules set.
The special Stalingrad rules for modelling the intense "rattenkrieg" urban combat seemed to replicate the challenges faced by both sides. The better rally and morale DRMs plus the higher Breakpoint for the Russians was still offset by their inexperience level for activation and firing DRMs. We continue to enjoy game play with this customized rules set.
Thanks
for taking the time to look at this AAR! Not sure what will be next.
I'd still like to do something like the Kommissar House or Pavlov's
House, but these seem to lend themselves more to skirmish level rules
than the company/battalion level BGPG rules.
Until
next time...
Gary
Great AAR and a very Squad a Leader style scenario :-)
ReplyDeleteThanks, Gary! I appreciated the AAR on your blog "Action At Tessel Bretteville" using these rules.
Deletehttp://sgtsteiner.blogspot.ca/2017/09/panzer-grenadier-deluxe-game.html
Intense and beautiful! What a pleasure to read such a well explained report, once again...Wonderful terrain and minis Gary!
ReplyDeleteThanks, Phil! I enjoy your blog reports as well. The binocular views and animated overhead situation graphics are a great idea!
DeleteHello Gary, glad you are back to PanzerGrenadier games after the summer sojourn. I do like your reports and this was another great Stalingrad game.
ReplyDeleteThanks, Shaun! I enjoy your website as well and always appreciate a fellow rules tinkerer!
Delete